I am excited to offer this “guest” blog post by a Teardropper I crossed paths with at a campground in 2022. We have the same “Silver Bullet” model in the narrow (4’ width) version, but we’ve each outfitted ours differently… you can imagine it was easy to strike up a conversation, and I’m glad we have continued our back-and-forth since then. The power system on Dave’s Teardrop is one of the most flexible setups I have seen and I am grateful to him for agreeing to write this piece to share the details.
A few additional thoughts on Neil’s excellent dissertation re: battery life in a Teardrop trailer (see previous blog post). I have the same trailer as Neil but in only two seasons managed to kill the supplied 80 amp-hour marine wet cell battery even though cautiously using it primarily just to run my 12-volt refrigerator.
Lithium Battery Benefits for a Teardrop Camper
After researching far too much on YouTube, I decided to go down the lithium path. Yeah it’s expensive, but half the weight and twice the useable power of comparable size lead-acid battery. The difference to weight—when it’s a tiny trailer with battery located near the tongue—is more than negligible, plus for us old guys, lifting or just dealing with the lighter weight is a big back saver.
I bought a 12 volt lithium 100 amp-hour as a direct replacement for the on-board battery which resides in the utility box at the front of the Teardrop. I also got a “Jackery”, self-contained power station essentially comprising its own internal lithium battery, inverter, and charge controller with 2×100 watt solar panels.
With the on-board and the portable power station, my system has two lithium batteries and all together they theoretically have 183 amp-hours of power (@ 12 volts), or 2196 watt-hours, though of course I would never discharge either battery down to zero. I also have the side benefit that if camping with family or friends, I can put the power station on a picnic table and everyone can charge their phones, games or whatever.
Integrating the Two Batteries into Teardrop Electrical System
The set-up as I built it allows me to simply plug either battery into one wire that powers the Teardrop trailer’s circuits, or if unplugged then everything is shut down and there is no chance of any parasitic draw.
Inside the Teardrop, the circuits I have wired are a combo-outlet with USB and USB-C, two 12V outlets, for reading lights etc. and the one 12V outlet in the galley for the refrigerator and of course the built in lights that I rewired for LED bulbs.

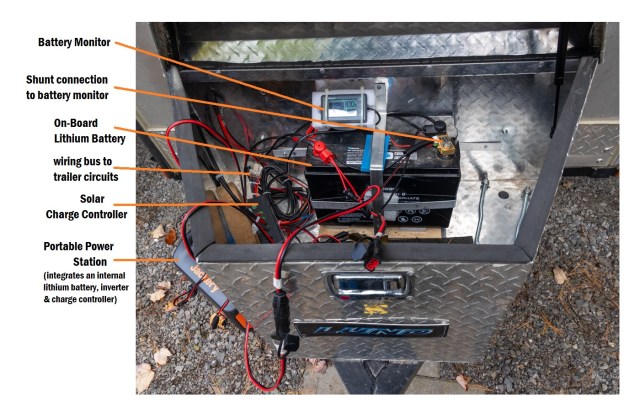
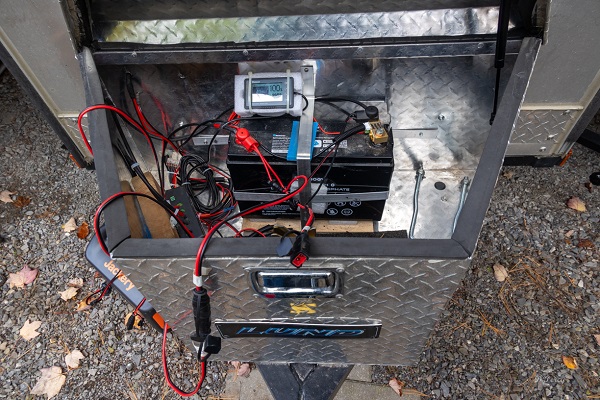
teardrop trailer lithium battery power system: schematic and actual (click either image to enlarge)
Charging Options for the Batteries
When grid power is available (e.g., at home, campground hookup, etc.), both batteries can be charged. With a 7-pin trailer plug, batteries can also be charged off your vehicle while driving, but that is not practical as a typical output off your 7-pin trailer connector is only 3-5 amps, barely a trickle charge.
In order to have off-grid recharging, I set about rigging up extension cords, splitters, adapters, plugs and a bus bar to power the Teardrop and charge via the solar cells and most importantly, make switching between the batteries a no brainer plug and play situation.
I brought all wiring from the Teardrop into the utility box through a mini bus bar (WAGO connector), then using one output cord with a universal plug. I bought NOCO extension cords, cut to length and use whichever half has the right connector on it. With a Y-harness, short extension cord or output cord, I can now quickly connect either battery to the Teardrop. Similarly, I can connect the solar panels to either battery just as easily, which means I can have one battery charging while the other runs the camper.
I usually put the power station under the Teardrop chassis on a 2×10 and the extension cord reaches into the toolbox. Now if the sun is shining on my campsite, I can plug the solar panels into the on-board lithium or the power station. And if in a shady site, I simply carry the power station over to an open area with the portable solar panels and charge it there.

Technical Considerations Designing my Teardrop Power System
What connector to use is a big issue. We are dealing with quite a variety of manufacturers for all the equipment. Sadly, it requires several different brands to mate with all the various hardware. I use 3 types: Anderson Power Pole, NOCO and the MC4. For splicing and even as mini bus bars I have been using WAGO connectors instead of Marettes as they seem convenient, handle stranded wire really well, are hydro approved so even good around the house.
Often overlooked, yet important for avoiding inadvertent damage, is knowing the charge state of your battery. To that end I bought a battery monitor with a shunt; about $90 on Amazon and easy to install. You will now know exactly what load you are taking out, how much is going in, and power capacity remaining.
Finally, for the gear-heads among us, here’s my equipment list:
- Renogy 100 amp-hour lithium battery
- Renogy 30 amp PWM charge controller
- Renogy shunt battery monitor
- Jackery 1000 watt power station
- Jackery 100 Watt solar panel x 2
- NOCO Genius 10 charger (use when grid power available)
- WAGO connectors for splicing etc.
- In-line automotive fuses on all wires
So, that’s how I do things with my Teardrop Trailer but by no means the full story or the best way. What about you? Add your own methods, ideas and experiences using the comment box below for the benefit of all readers.
